1.Purge
1.1.Introduction
The purpose of this range of product is to offer a set of digital audio functionalities for radio broadcasters. This range of products is composed of several softwares that have to do with sound treatment.
The Purge software is aimed at purging those files used by the other products from the range.
1.1.1.User Interface
The main screen is divided into two parts :
the upper part showing the browser (allowing a manual purge)
the lower part showing the different parameters for the purge (allowing an automatic purge)
These two parts are themselves divided into several tabs (News, Music...) depending on the type of documents they contain.
1.2.Software Installation
1.2.1.Purge Installation
To install Purge, launch the file called "Purge.msi".
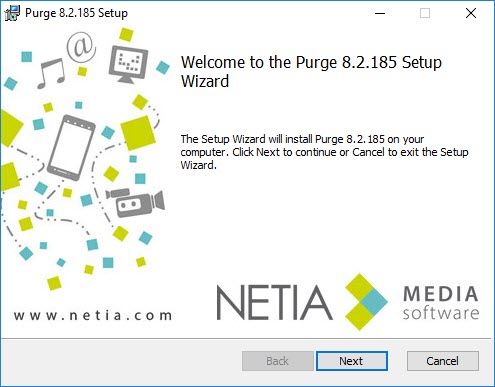
Click on  to start the Setup Wizard
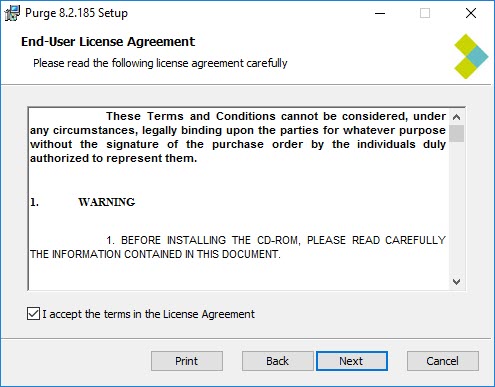
Check the box to validate terms of license agreement.
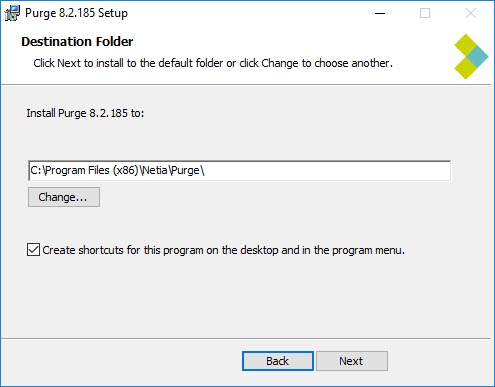
By default the Setup Wizard installs all the files on the directory C:\Program Files(86)\Netia\Purge.
Check the box in order to create the shortcuts.
Click on  .
.
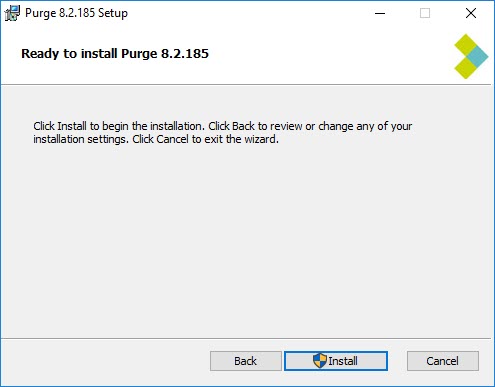
Click on  .
.
Click on 
Purge is installed.
1.3.Executing the User Interface
Double-click on the Purge icon on the desktop to execute the software's user interface in order to install the automatic purge service.
Log as "Administrator" and enter the appropriate password to execute the user interface.

Once "Purge" is opened, click on the following button  to install the purge service. Select the account and note the password to install the service.

Install the purge service by using a service account belonging to the domain administrator group.

1.4.Functioning of the Purge
1.4.1.Manual Purge
Manual purge is done via the browser, in the upper part of the software, which gives you access to the database content.

To manually delete an item, select it in the list and click on  .
.
IMPORTANT : When an item is deleted via the browser, the material file is not physically deleted on the file servers, the indexing of this element remains in the database and is no longer visible in the browser (STATE=3 : Deleted).
To purge it permanently from the database, it is necessary to do a manual purge. Right-click on  to open the purge window.
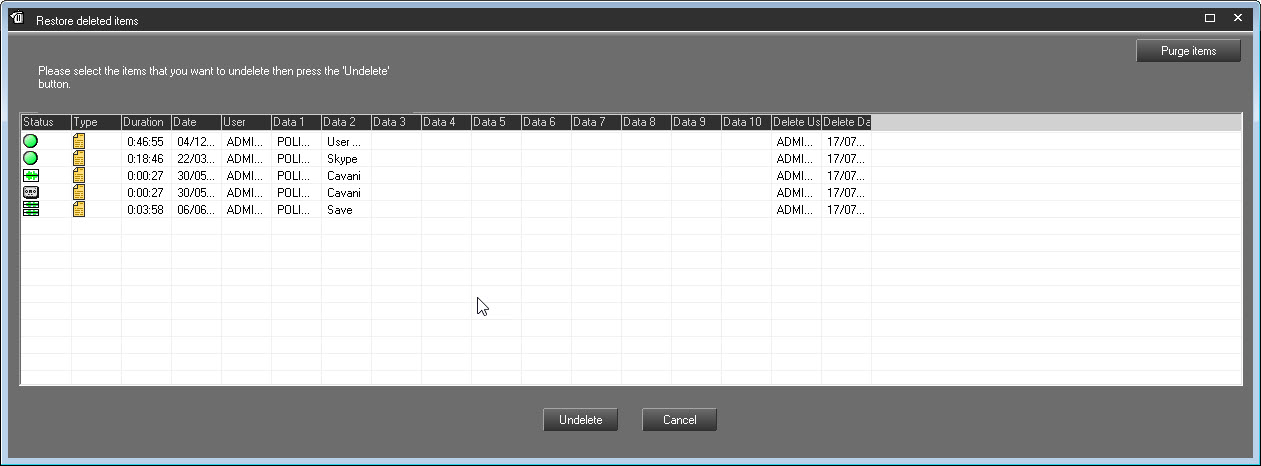
Select the sound(s) to purge and click on  .
.
Items are physically deleted from the database.
For security reasons, some documents in the database can't be deleted :
documents for which recording has not finished yet. A document can't be deleted while recording is in session. Similarly, when a document is being used by another workstation, it can't be deleted.
original documents (raw files) used by one or several virtual documents. "Virtual' documents (being the fruit of an editing work) in the database and original documents are correlated. As long as an “edited” element has not been “masterized”, the original document used for this editing work can't be destroyed.
the "locked" documents. From the production workstation, a user can lock an element in the database. This means that the document can't be deleted. It will remain inside the system until it is "unlocked".
the documents that are used by a broadcast list. As long as a file belongs to a broadcast list (playlist, cartstack...), this document can't be purged.
the documents “Ready-To-Archive” or “Archivable”. From the production workstation, a user can add the "Ready-To-Archive" or the "Archivable" flags to a document in the database. This means that this document has to be archived. Once this document is archived, those two flags disappear and are replaced by the "Archived" flag. From this very moment, the document can be purged.
1.4.2.Automatic Purge
Principle
The automatic purge operation is a two-step process :
First, the program identifies the documents that are "candidates to the purge". These documents must correspond, like it is the case with the manual purge, to a set of criteria linked to the good functioning of the radio.
Note : the following documents can't be purged
the documents that are being recorded
the "locked" documents
the documents belonging to a broadcast list (playlist, cartstack...)
From this list of documents that are “candidates to the purge”, the purge only deletes those documents which correspond to the specific parameters defined by the radio.
Terms
There are three methods to purge :
Purge by number of days :
The number of days correspond to the difference between the current date and the recording date of a document. The configuration module, which is included in the software, allows you to define the maximum number of days by type of document (Temporary, News, Music, Jingle....). When the maximum number of days has been reached, the software deletes the oldest documents until the number of days associated to the oldest document is inferior to the maximum number of days desired. In this module, the raw, master or virtual types of documents can be deleted.
Purge by number of documents :
The configuration module, which is included in the software, allows you to define a maximum number of documents for each type of documents (Temporary, News, Music, Jingle....). When the maximum number of documents has been reached, the program deletes the oldest documents until the number contained in the database is inferior to the maximum number of documents that has been defined. Thanks to this module, the raw, master or virtual types of documents can be deleted.
Purge by space disk :
The configuration module, which is included in the software, allows you to define the free space available for each type of documents (Temporary, News, Music, Jingle....). When the size occupied by a type of document exceeds the allocated amount of space on the drive, the program deletes documents until the space disk occupied by those very documents returns to a state where it is inferior to the value previously defined in the software. In this module, only the original or master documents can be deleted.
Watch out :
If, for a type of documents (Temporary, News, Music, Jingle, Adverts), no method of automatic purge has been activated, the user of the program has to manually delete the documents via the Browser.
If, for a type of documents, the deletion method for each space drive hasn't been activated, the disks can be full and the system can prevent users from saving new documents.
The deletion methods are always applied in the following order :
by space disk,
by number of days,
by number of documents.
When a document is purged, it does not appear in the Browsers of the different workstations in the network anymore. In practice, the sound is immediately deleted from the database. As regards the indexing of this document, it really is deleted from the database "n" days away from the purge date ("n" being modifiable).
Watch out: the date and hour of the purge station must be maintained properly. An improper entry on any of those values can have dramatic consequences.
The Temporary tab represents the elements that have not been classified in the database. These are, first and foremost, elements that have been automatically saved, which remain in the database despite of everything and that need to be purged. These elements are marked with the "?" symbol in the database.
1.4.3.Visualization by tab
Each tab allows you to visualize a certain amount of information which is classified by type of documents (Temporary, News, Music...).

For each tab, you have access to the following set of information :
 |
 |
 |
 |
 |
 |
UNC Server path and name : allows users to visualize the name of the path to the directory where those types of documents are stored, as well as the free disk space available (values given in mega-bytes and in percentage) on those drives.  |
The implementation of the purge and the configuration are reachable thanks to the following buttons :
 | Button allowing users to navigate between the different tabs. |
 | Install/Uninstall : allows you to install the automatic Purge (you normally execute this when using the program for the first time). The automatic purge is a service. Installing this requires first to create a user account, on the domain controller that is specific to the purge, with administrative rights on the active directory domain. |
 | Installation DB : allows you to configure the database(s) that must be purged. |
 | On / Off : To start the service. By clicking again on this button, the service stops. Once the service is started, the purge motor remains active and keeps on working as a background task even when you quit the software or if the NT session has been closed. |
 | Parameters : allows you to have access to the configuration window. |
 | Button indicating the connection state to the database(s) : according to the connection state, the color of the button changes : - light green : connection is active - dark green : connection has been temporarily lost, because it was not necessary - red : connection is lost. |
 | Indicator of the purge activity : When the purge is active during the hours for which it has been programmed, an animated icon is visible on the right side of the screen, just under the function buttons. |
1.4.4.Parameters for the Automatic Purge
Only a user with administrator rights (set via the Administror software) can configure the automatic purge.
 | The "Purge parameters" button on the main screen gives you access to the configuration window. |
Enter your login and your password to display the window.

The configuration window is divided into two parts :
the left part contains the parameters shared by any type of document
the right part contains the parameters that are specific to each type of document and distributed between the different tabs (News, Music...)

1.4.5.Shared Parameters
 |
 |
 |
 |
 |
 |
 |
 |
 |
 |
 |
 |
 |
Auto-Synchronize T_SECUR folders : this process allows you to synchronize the file servers based on the information contained in the T_SECUR table. When these files are not present on one or several file servers, the synchronization process performs a simple copy of the files. HKEY_LOCAL_MACHINE\SOFTWARE\NETIA\Radio-Assist\8.0\Purge\PurgeParams SynchroFolderActivated : value O for inactive or 1 for active  |
File server Auto cleaner : this process allows you to get rid of orphan items, orphan items being files without any referrence in the database . |
(MP2) Main sound file : When this option is activated, the purge program deletes the MP2 associated files in the T_ITEM table.  |
Watch out : the normal elements (State=2) and the archived ones (State=4) are deleted via a global configuration done in each tab. The normal elements (State=2) switch to the next state (State=3) and the archived elements (State=4) switch to the next state (State=5).
1.4.6.Tab Specific Parameters (types of documents)
For these parameters, you must select the desired settings for each type of docments, going from one tab to another.
Description of these parameters for each tab:
 |
 |
 |
 |
Note : when your system uses dynamic tabs (customized) these are visible in the parameters window like any traditional tab.
To validate the whole set of parameters that have just been defined, it is necessary to tick the boxes that should be taken into consideration by the Purge program, then click on the following button :

Important : When parameters have been set but you didn't tick the box, the purge wont take this parameter into account.
1.4.7.Registry Base Settings
Some of these keys have been created by default by the Purge software application. You have to create them manually in the registry base
Creation process of an XML file when the element has been erased.
The purge service can create an XML file when the item has been erased.
To activate this process, use the following registry key:
[HKEY_LOCAL_MACHINE\SOFTWARE\NETIA\Radio-Assist\8.0\Purge\PurgeParams]
“XML - Create XML for deleted Items”=”Yes”
“XML - Path for XML”=”C:\XML \”